








Author: Felix Lee, CEO at Forgecise
Published: May 26, 2026
Target Audience: Additive Manufacturing Fleet Managers, Enterprise Workshop Technicians, B2B Procurement
Table of Contents
Executive Summary / Quick Answer: If you are asking, “Do you take film off of resin 3D printer plate?” the answer is a definitive Yes. You must remove the clear or blue-tinted temporary PVC shipping liner from the aluminum build plate before calibration. Failing to do so completely prevents the liquid resin from establishing a chemical or mechanical bond, causing immediate adhesion failure. However, managing polymer interfaces goes far beyond the build plate. This guide outlines the exact standard operating procedures (SOPs) required for B2B fleet operations to manage LCD screen protectors, release films (FEP/PFA/ACF), and preventative maintenance.
The Importance of Polymer Interface Management in B2B Additive Manufacturing
For enterprise and industrial 3D printing fleets, success relies on operational efficiency, machine uptime, and reducing scrap rates. Liquid photopolymer-based 3D printing—specifically stereolithography (SLA), digital light processing (DLP), and masked stereolithography (MSLA)—offers exceptional surface finish, high dimensional accuracy, and the ability to process engineering-grade elastomers and rigid polymers.
Bottom-up resin printing puts massive mechanical peel forces and strict optical demands on key hardware boundaries. The most important of these boundaries are:
- The build plate-to-resin interface
- The resin-to-release film interface
- The release film-to-optical mask (LCD/LPU) interface
Many initial hardware failures, damaged components, and costly production delays stem from a simple mistake: mismanaging factory-applied protective films. Manufacturers of industrial and desktop resin printers systematically apply temporary protective films to various components to prevent scratching, dust accumulation, and oxidation during transport and assembly.
If technicians do not systematically identify and remove these films during unboxing or consumable replacement, they alter the chemical, optical, and mechanical properties of the printer. The consequences range from immediate adhesion failures to ruined resin vats, cracked LCD screens, and voided warranties. For business-to-business (B2B) clients running manufacturing lines, standardizing the identification and removal of these films through rigorous Standard Operating Procedures (SOPs) is essential to eliminate early-lifecycle failures and protect high-value capital assets.
Complete Mapping of Protective and Functional Films
An industrial-grade MSLA or SLA printer contains several layers of polymer films. Some are temporary shipping materials, while others are permanent, functional optical components. Differentiating between these films is a fundamental requirement for operational technicians.
Hardware Stack Diagram:
- Build Plate (Aluminum) ->
[X] Remove Temporary PVC Film - (Liquid Resin Interface)
- Resin Vat ->
[X] Remove Double-Sided Film|[ ] Keep Permanent FEP/PFA/ACF - (UV Light Transmission)
- LCD Screen ->
[X] Remove Temporary Film|[ ] Do NOT Peel Polarizer Filter|[O] Install Tempered Glass
1. Build Plate Shipping Films
The build plate, typically manufactured from anodized or laser-etched aluminum, serves as the substrate where the initial “burn-in” layers of photopolymer resin must firmly adhere. To protect this surface from oxidation and physical abrasions during shipping, manufacturers cover the plate with a highly adhered, clear or blue-tinted polyvinyl chloride (PVC) protective film.
Because early manual models often lacked prominent pull-tabs or clear warnings on this specific layer, operators frequently attempted to calibrate and print directly on top of the film. This error completely prevents the liquid resin from establishing a chemical or mechanical bond with the underlying metal, causing immediate adhesion failure. Over a multi-hour print cycle, exposure to UV light and localized heat can cause the film to warp or trap liquid resin underneath. This leads to a cured block of polymer that is highly difficult to remove without permanently gouging the plate.
2. LCD Screen and Polarizer Protectors
The monochrome LCD screen sits directly beneath the resin vat, serving as the optical mask that shapes each layer by blocking or transmitting UV light. During unboxing, you must peel a temporary transparent film off the screen to allow unimpeded UV light transmission.
Critical Warning: Technicians must exercise extreme caution. Directly beneath this temporary shipping film is the polarizing filter, which is a permanent, integrated component of the LCD stack. Peeling off the polarizer destroys the screen’s ability to selectively block UV light, completely ruining the LCD and voiding the manufacturer’s warranty. To protect this delicate screen assembly from accidental resin spills, punctures, or mechanical damage from failed prints, industrial operators should install a dedicated, sacrificial tempered glass screen protector over the screen, secured at the borders with light-blocking tape.
3. Release Films: FEP, PFA, and ACF
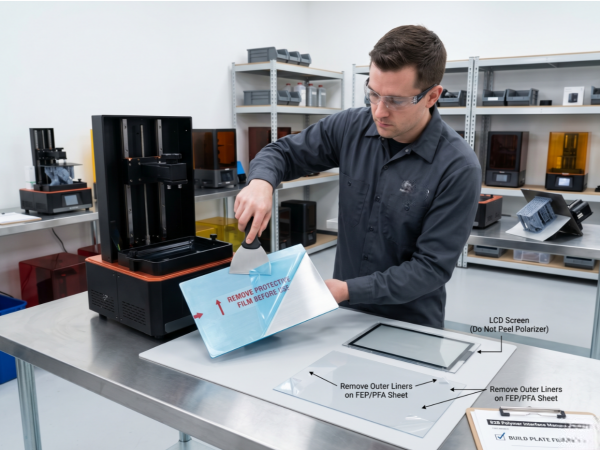
At the bottom of the resin vat lies the release film. It acts as a non-stick barrier between the curing resin and the underlying light source. Replacement sheets of these films are highly delicate consumables. Most importantly, new replacement sheets of FEP (Fluorinated Ethylene Propylene), PFA, or ACF (Advanced Release Film) ship with ultra-thin, highly transparent protective liners on both sides.
Operators must peel these liners off before bolting the release film into the vat frame. If installed with the liners intact, the film will lack the necessary elasticity, suffer from severe optical distortion, and quickly tear under mechanical peel forces. This leads to massive resin leaks directly onto the LCD screen.
Industrial Mapping Table: Polymer Films and Interfaces
| Component | Film Type | Visual Characteristics | Factory Purpose | Mandatory Action | Failure Mode if Neglected |
| Build Plate | Temporary Shipping Liner | Clear or transparent blue PVC; occasionally lacks labels. | Prevents surface scratches and oxidation during transit. | Remove prior to first calibration/leveling. | Complete print adhesion failure; resin cures only on the vat bottom. |
| LCD Screen | Temporary Shipping Liner | Transparent thin plastic; often has a colored pull-tab. | Protects the screen glass from scratches during assembly. | Remove before installing the resin vat. | Light diffusion, curing inaccuracies, and adhesion to the vat bottom. |
| LCD Polarizing Filter | Integrated Optical Layer | Matte grey or dark tinted film bonded directly to the LCD. | Polarizes light to enable selective UV blocking and curing. | DO NOT REMOVE; permanent component. | Total LCD failure; continuous full-screen UV exposure; voided warranty. |
| Replacement FEP/PFA/ACF | Dual-Sided Protective Liners | Micro-thin, highly transparent sheets on both faces of the consumable. | Prevents dust accumulation and scratching during storage. | Peel both sides before installing in the vat frame. | Loss of film tension, severe optical distortion, tearing, and immediate resin leaks. |
| ACF Release Film (Installed) | Functional Release Membrane | Soft, semi-matte fluoropolymer sheet; highly delicate. | Acts as the non-stick vat floor; minimizes peel force during lift. | Retain; replace only when worn or punctured. | Vat leakage, optical degradation, and mechanical failure of the tilting mechanism. |
FAQ & Forum Intelligence: Synthesizing Professional B2B Solutions
Analysis of discussions across professional additive manufacturing forums reveals a clear gap between manufacturer packaging design and user interface standards. Here are the top five issues and authoritative solutions for enterprise fleet operations.
Q1: Why doesn’t the build plate film have a warning tab? (The UX vs. Diligence Debate)
Short Answer: Manufacturer packaging lacks standardization, making mandatory physical inspection by the operator a strict requirement.
The Debate: Operators frequently complain that while LCD screens and vats have color-coded pull-tabs with “Peel Off Before Use” warnings, build plate films are often completely clear, flush, and unlabelled. This causes failed calibrations. Is this a UX failure or a lack of operator diligence?
Authoritative Solution: Relying on inconsistent factory packaging is a systemic risk for B2B fleets. Procurement and training managers must implement a mandatory, standardized “Pre-Flight” unboxing checklist. This requires a physical inspection of the build plate’s surface with a non-marring plastic edge tool to confirm the absence of any polymer film prior to machine commissioning. (Newer hardware, like the Elegoo Saturn 4 series, has started printing warning graphics directly onto the film to address this).
Q2: How do I safely remove highly adhered prints from a bare aluminum build plate?
Short Answer: Apply extreme temperature changes (like freezing or hot water) to break the bond instead of using force.
The Debate: When prints bond too tightly to bare metal, aggressive scraping with steel spatulas results in gouged plates, warped surfaces, or destroyed geometries. Should fleets modify hardware (flexible plates, sanding) or adjust software (burn-in exposure)?
Authoritative Solution: Technicians should leverage thermal expansion differentials. Aluminum has a high Coefficient of Thermal Expansion (CTE), defined by the linear thermal expansion formula:$$\Delta L = \alpha L_0 \Delta T$$
Where:
- $\Delta L$ is the change in linear dimension.
- $L_0$ is the initial length.
- $\alpha$ is the coefficient of thermal expansion (for aluminum, $\alpha \approx 23 \times 10^{-6} \text{ K}^{-1}$).
- $\Delta T$ is the temperature differential.
Because the CTE of aluminum is significantly higher than that of cured photopolymer resin, subjecting the assembly to extreme temperature changes induces localized interfacial shear stress, breaking the adhesive bond. The best non-destructive industrial methods are:
- Cryogenic Shock (Freezing): Place the entire assembly into a freezer at $-18^\circ\text{C}$ for 15 to 30 minutes. The aluminum contracts faster than the resin, popping the model off.
- Thermal Softening (Heat): Pour boiling water ($\sim95^\circ\text{C}$) on the base, or use a low-temp heat gun. This expands the aluminum and softens the cross-linked polymer network, making it pliable.
Operators must avoid deep gouges from steel spatulas, as sharp burrs can subsequently puncture the FEP film during homing.
Q3: What is the safest way to clear failed print debris without touching the FEP?
Short Answer: Use the “Vat Clean” function to cure a solid layer and pull it out in one piece using a paper corner tab.
The Debate: Manual scraping of cured debris with plastic spatulas frequently scratches or dents the delicate FEP release film, causing premature wear and optical distortion.
Authoritative Solution: Utilize the non-invasive “Vat Clean” (Tank Clean) Monolithic Extraction Method.
- Place a discarded piece of cured support structure, an L-shaped folded paper card, or a post-it note flat into one corner of the vat, resting directly against the FEP.
- Run the UV exposure function for 15 to 30 seconds to cure a single, uniform sheet across the bottom, locking the card into the matrix.
- Gently pull upward on the dry portion of the card. The entire cured sheet—along with all trapped debris—will peel away cleanly in one piece, leaving the FEP pristine without any scraping tools.
Q4: Should I replace my release film based on the software layer-count warning?
Short Answer: No. Base your replacement on actual physical wear like heavy haze, deep dents, or a loss of film tension.
The Debate: Modern high-end printers (like the Elegoo Saturn 4 Ultra or Mars 5 Ultra) prompt film replacement at set limits (e.g., 60,000 layers). Does this require immediate replacement even if prints succeed?
Authoritative Solution: The firmware layer-count is a purely arbitrary, conservative heuristic. Properly maintained films can withstand 150,000 to over 500,000 layers. Fleet managers should ignore the counter and evaluate films based on concrete visual and mechanical metrics:
- Cloudiness and Haze: Severe, opaque cloudiness diffuses UV light, causing localized under-exposure failures.
- Physical Deformations: Micro-dents or deep creases cause high mechanical stress. If you see stretching or micro-tears, replace the film immediately to prevent rupture.
- Tension and Sound: A healthy film emits a clear, drum-like resonance when tapped gently. A dull, flaccid response indicates plastic deformation (stretching), which requires higher Z-axis lift distances to release and causes support failures.
Q5: How do I clean a resin leak on the LCD screen without destroying it?
Short Answer: Never use acetone. Soak the cured resin with IPA to soften it, then gently slide a blade under it at a low angle.
The Debate: Punctured release films leak resin onto the LCD, which cures under UV light. Operators often destroy screens using metal blades or aggressive solvents like acetone.
Authoritative Solution: Acetone must never be used; it immediately dissolves the polarizing filter, adhesive bonding layers, and the plastic chassis. Follow this industrial remediation protocol:
- Soak and Soften: Place a folded microfiber cloth or paper towel over the cured resin spill. Saturate it with Isopropyl Alcohol (IPA, $\ge95\%$) or hot water. Cover and let it sit for 10 to 15 minutes. The solvent or heat penetrates the polymer matrix, causing it to swell and soften.
- Low-Angle Scraping: Use a brand-new plastic razor blade (or a metal blade held at an extremely shallow angle $<10^\circ$) and gently slide it beneath the softened resin. It should peel away like wax.
- Final Clean: Wipe the screen with screen-cleaning foam and a clean microfiber cloth.
To completely eliminate this failure mode, B2B operations must install a sacrificial tempered glass protector over the LCD screen.
B2B Operational Maintenance and Quality Assurance Framework
For B2B operations, relying on reactive troubleshooting is economically non-viable. Minimizing downtime and ensuring a high yield of functional parts requires a standardized, preventative maintenance schedule.
Standardized Maintenance Schedule for Industrial MSLA Fleets
| Frequency | Target Area | Maintenance Action | Verification Criteria |
| Post-Print / Daily | Build Plate | Remove model residue; clean surface with 95%+ IPA. Inspect for burrs or deep scratches. | Build plate must be smooth, flat, and completely free of uncured resin film or metal burrs. |
| Post-Print / Daily | Resin Vat & Film | Execute the “Vat Clean” protocol if print failure occurred. Inspect FEP/PFA/ACF for punctures under backlight. | The release film must be clean, dry on the underside, and devoid of punctures or severe cloudiness. |
| Daily | Optoelectronics | Clean the LCD screen glass/protector surface with a microfiber cloth and IPA. | Zero dust, fingerprints, or resin smudges; perfect light transmission. |
| Weekly | Sensors & Mechanicals | Clean and inspect the optical Z-axis limit switch, temperature sensors, and resin level probes. Lubricate the Z-axis ball screw. | Smooth Z-axis motion without vibration or noise; sensors free of resin crusting. |
| Monthly | Light Engine | Run a dry exposure test (vat removed) with a blank paper sheet over the LCD to check for dead pixels. | LCD screen displays uniform exposure patterns; no dark spots or flickering pixels. |
| Threshold-Based | FEP/PFA Replacement | Replace the release film when deep creases, micro-tears, or severe loss of tension occur. | Installed film must ring like a drum ($\sim150\text{ Hz}$ to $250\text{ Hz}$ depending on vat size) and show no leaks under water-testing. |
Strategic Recommendations for Enterprise Fleet Management
To achieve maximum efficiency and predictability across commercial 3D printing labs, enterprise managers should execute the following structural protocols:
- Implement a Strict “Three-Film” Verification SOP Before any printer is permitted to run its first calibration, a technician must physically sign off on the removal of the three critical temporary films:
- The build plate shipping film.
- The LCD screen protection liner.
- Both protective layers of any newly installed FEP/PFA/ACF sheet.
- Standardize on Homogeneous Consumables Avoid mixing FEP and PFA films across identical printer models within the same fleet. PFA and FEP have different elasticity, tensile strength, and release characteristics. Mixing these materials forces operators to maintain disjointed slicer profiles and exposure settings, increasing human error and reducing print success rates.
- Adopt Magnetic Flexible Build Plates For high-throughput B2B environments, manual scraping from rigid build plates is a major bottleneck and a source of physical wear. Installing high-quality magnetic flexible steel build plate covers allows operators to instantly pop prints off by gently flexing the steel sheet. This eliminates down-time, protects the plate’s leveling calibration, and ensures technician safety.
- Mandate Strict Chemical and Environmental Control
- Never allow acetone into the printing area. Standardize on 95%+ Isopropyl Alcohol (IPA) or Tripropylene Glycol Monomethyl Ether (TPM) for all part washing and screen cleaning.
- Maintain a controlled operating environment with ambient temperatures stabilized between $20^\circ\text{C}$ and $28^\circ\text{C}$. Highly divergent ambient temperatures alter resin viscosity, which drastically affects peel forces and adhesion mechanics, leading to inconsistent print quality and premature wear of the release film.
- Ensure all waste photopolymer resin and contaminated cleaning tools are fully cured under UV light or direct sunlight prior to disposal to comply with local environmental regulations and mitigate toxicity hazards.