


- Author: Felix Lee, CEO at Forgecise
- Published Date: June 3, 2026
- Category: Additive Manufacturing, Operations & Safety, Industrial Post-Processing
- Reading Time: ~18 minutes
About the Author
Felix Lee is the CEO of Forgecise, an enterprise additive manufacturing consultancy. With over fifteen years of hands-on experience running industrial 3D printing labs, Felix works with global manufacturers to scale Stereolithography (SLA) workflows, manage chemical safety, and build closed-loop solvent recycling systems.
Table of Contents
The Post-Processing Bottleneck in B2B Additive Manufacturing
In B2B additive manufacturing, stereolithography (SLA) post-processing decides the mechanical strength, surface quality, and dimensions of your printed parts. Setting up standard post-processing steps makes your output consistent, cuts down on material waste, and lowers health risks from wet, uncured photopolymer resins.
Learning how to clean up resin printer systems and printed parts is a core engineering requirement, not just a way to keep your workshop tidy. Uncured liquid resin left on build surfaces cures under ambient light. This ruins build platforms and destroys fine details. This guide outlines the exact operating procedures, chemical comparison data, safety rules, and real-world setups you need to run an efficient resin printing lab.
I. Step-by-Step SOP: Cleaning Your Prints and Post-Processing Setup
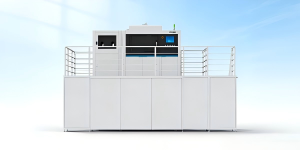
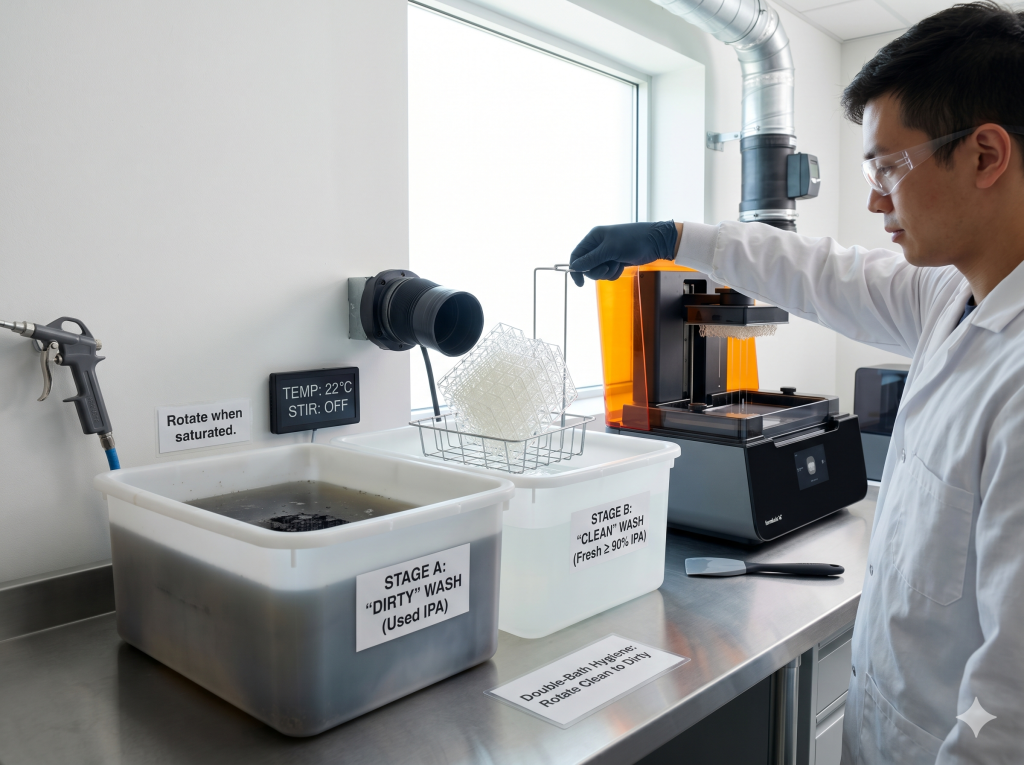
[Image of Dual-Bath Resin Washing Station and Post-Processing Workflow]
Step 1: Pre-Wash Scrape & Liquid Recovery
The cleaning process starts the moment your print finishes. Before putting parts into any solvent liquid, scrape off the excess liquid resin.
- Tooling: Use a flexible silicone spatula or a soft plastic scraper. Do not use metal scrapers inside the vat, as they can scratch the release film (FEP/nFEP).
- The Reason: Scraping excess resin back into the tank keeps the solvent baths cleaner for a longer time, which lowers your overall chemical spend.
Step 2: The Two-Bath Sequential Washing System
A highly efficient workflow uses two separate wash baths in a specific sequence, called the “dirty” and “clean” stages.
[Completed Print]
       │
       ▼
┌──────────────────────────────┐
│  Stage A: "Dirty" Wash       │ <--- Partially resin-saturated solvent (IPA or TPM)
│  (Removes bulk liquid resin) │
└──────────────┬───────────────┘
               │
               ▼
┌──────────────────────────────┐
│  Stage B: "Clean" Wash       │ <--- Fresh, high-concentration solvent (≥90% IPA)
│  (Cleans microscopic film)   │
└──────────────┬───────────────┘
               │ (When saturated, rotate Clean to Dirty)
               ▼
   [Dry & Prepare for Curing]
- Stage A: The “Dirty” Wash: Submerge the printed part in a primary bath of Isopropyl Alcohol (IPA) or Tripropylene Glycol Monomethyl Ether (TPM) that already contains dissolved resin. This bath strips the bulk of the wet resin from the outer surfaces and deep channels.
- Stage B: The “Clean” Wash: Move the print to a secondary bath of fresh, high-concentration solvent (such as $90\%$ or higher IPA). This wash dissolves the thin, microscopic film left on the print, giving it a clean finish.
- Rotating Your Solvent: When the clean bath begins to accumulate too much resin, move it to become your new dirty bath. Take the old dirty bath and schedule it for recycling or hazardous waste disposal.
Step 3: Flushing Complex Geometries
Standard washing systems cannot always clean complex internal channels, microfluidic paths, or deep blind holes.
- The Solution: Use syringes or specialized flushing tools to force clean solvent directly through these internal pathways.
- The Reason: This keeps liquid resin from pooling inside. If trapped resin cures under UV lights later, it will block the channels and ruin the part.
Step 4: The Critical Post-Wash Drying Phase
Let the cleaning solvent evaporate completely before you start the UV post-cure stage.
- The Risk: If you cure a part while it is still wet with solvent, it triggers a chemical reaction. This reaction leaves a permanent white, powdery haze or creates tiny surface cracks, weakening the plastic.
- For Volatile Solvents (like IPA): Let the parts air-dry in a well-ventilated space for at least $30\text{ minutes}$. You can use clean compressed air to speed up the drying process and clear tight spaces.
- For Non-Volatile Solvents (like TPM): Rinse the prints thoroughly with water or IPA to wash away the oily film before you dry them.
II. How to Clean Up and Maintain Printer Hardware
Maintaining your equipment is a major part of learning how to clean up resin printer setups. Leaving spilled resin on your printer parts causes mechanical binding and print failures.
1. Build Platform Maintenance
Clean the build platform with IPA and paper towels every time you switch resin types or put the printer into storage.
- Z-Stage Alignment: Resin that pools and cures on the edges or clamp joints of the platform blocks it from seating correctly on the Z-stage. This causes leveling errors and print failures.
- Scratches Are Normal: Do not try to polish out scratches on your metal build platform. These tiny scratches help the first layers of your prints stick better.
2. Resin Vat & Work Surface Decontamination
- Spill Cleanup: If you spill resin on the printer glass, LCD screen, or frame, wipe it up immediately with a lint-free microfiber cloth and high-purity IPA before ambient room light cures it.
- Safe Storage: When you remove vats to swap resins, store them in light-tight, dust-proof cases to keep them safe from stray UV light and airborne dust.
III. Beyond Standard Cleaning: Advanced Finishing & Polishing Techniques
To get high-quality, clear finishes on industrial prototypes, combine your standard washing with advanced finishing.
[Image of Sandpaper Grit Progression on Resin 3D Printed Parts]
1. Pre-Cure Sanding Protocol
Sand your parts after they are dry but before final UV curing. Uncured resin is softer and much easier to sand than fully hardened plastic.
- Sanding Grit Progression: Start with a lower grit sandpaper and slowly work your way up to finer grits.
- Tooling: Hand sanding works well for simple shapes. For highly complex parts with deep recesses, use media blasting or polishing tools.
- Surface Quality: Using $3,000\text{ grit}$ sandpaper gives a smooth, glossy surface. Moving up to $12,000\text{ grit}$ creates a mirror-like, reflective finish.
2. Wet Sanding Safety
Always sand your parts under running water or use wet sandpaper. This keeps dangerous, fine resin dust out of the air so you do not breathe it in, while also giving you a more even surface finish.
- Post-Sanding Prep: Use a microfiber cloth to wipe away any leftover powder or dust.
3. Surface Clarity Optimization
If you need highly transparent parts (like lenses or clear casings), rub a thin layer of mineral oil onto the part after the final wash. This fills in microscopic scratches to create a clear, high-gloss surface.
IV. Chemical Agent Showdown: Solvent Selection and Trade-offs
The cleaning solvent you choose changes your wash times, operating costs, and fire safety requirements. The table below compares the main solvents used in professional resin labs.
Solvent Comparison Matrix
| Solvent Type | Flammability Risk | Evaporation Rate | Mechanical Finish Influence | Primary B2B Operational Trade-Offs |
| Isopropyl Alcohol (IPA) $\ge 90\%$ | High (Flash Point: $\approx 12^\circ\text{C}$) | Rapid; needs regular top-offs because it evaporates fast. | Excellent; dissolves resin quickly without swelling if wash times are kept short. | Requires strict Class 1 Division 1/2 electrical setups; high evaporation losses. |
| Tripropylene Glycol Monomethyl Ether (TPM) | Low; non-flammable. | Very slow; leaves an oily residue. | Gentle; works well for biocompatible and sensitive engineering parts. | Needs a second rinse with water or IPA; makes the post-processing cycle longer. |
| Formlabs Resin Washing Solution | Non-flammable | Moderate | High dissolution; holds $2\times$ more resin than IPA before it gets saturated. | Safer for standard rooms; requires sourcing from a single supplier. |
| Bio-Ethanol ($92\text{–}95\%$) | High | Rapid | Similar to IPA. | High purchase cost ($2\times$ the price of IPA); has a less persistent smell. |
| Methyl Hydrate | High | Rapid | Cleans parts well without needing mechanical agitation. | Highly toxic chemical profile; requires advanced respirators and heavy ventilation. |
Choosing Your Chemical
IPA is the industry standard because it evaporates quickly and dissolves resin fast, but it evaporates out of open tanks quickly, meaning you have to add fresh solvent often.
If fire codes or insurance rules limit how much flammable liquid you can store, TPM is a safe, non-flammable choice. Just remember that its oily film requires an extra wash step with water or IPA. Formlabs Resin Washing Solution offers a balanced middle ground: it does not burn and holds twice as much dissolved resin as IPA, which cuts down on how often you have to change out your tanks.
V. Laboratory Design, PPE, and Environmental Compliance
Industrial 3D printing labs must follow safety and environmental rules set by OSHA, the EPA, and ANSI. Wet, uncured photopolymer resins contain reactive monomers and acrylates that cause skin allergies, rashes, and lung irritation.
1. Ventilation and Air Quality Engineering
Open windows or basic home fans are not enough for professional print labs. You need active air systems to handle chemical vapors and tiny airborne particles ($1\text{ to }100\text{ nm}$ in size) from your printers and wash tanks.
- Air Exchange Rates: Under the ANSI/ASSP Z9.5 standard for chemical work spaces, your lab needs $4\text{ to }10\text{ air changes per hour (ACH)}$. High-volume labs often target $5\text{ to }10\text{ ACH}$ to handle solvent fumes safely.
- Pressure Control: Keep your printing room under negative air pressure compared to the offices next door. This pressure difference ensures that when doors open, clean air flows into the lab, keeping chemical fumes from leaking into shared office spaces.
- Local Exhaust Ventilation (LEV): Route exhaust ducts from your printers and wash stations directly outside. Carbon filters help clean the air, but they should not be your primary safety system in busy labs.
2. Essential PPE Standards for Safe Cleanup
Handling raw resin and washing solvents without protective gear is a major safety violation.
[Image of PPE Standards for Industrial Resin 3D Printing Labs]
- Hand Protection: Standard latex gloves do not block acrylates and solvents. Operators must wear chemical-resistant nitrile gloves that are at least $0.15\text{ mm}$ thick. Swap your gloves for a fresh pair every $5\text{ minutes}$ when handling wet resin to stop chemicals from soaking through the material.
- Respirators: If your ventilation system is down for maintenance, or when you are cleaning large open solvent tanks, you must wear a NIOSH-approved organic vapor respirator (like one with 3M 6001 cartridges). Paper dust masks do not block chemical vapors.
- Eye Protection: Always wear chemical splash goggles or full-face shields during washing to protect your eyes from splashes and flying support pieces.
3. Waste Disposal and Environmental Rules
Pouring dirty solvents, resin waste, or contaminated wash water down municipal drains is illegal. Wash water from water-washable resins still contains toxic monomers that harm municipal water systems and wildlife.
- On-Site Treatment: Store all liquid waste in labeled, chemical-resistant containers. For water-based waste, you can separate the resin solids by exposing the liquid to UV lamps or sunlight.
- Solid Waste Disposal: Once the resin cures, it settles into a solid, safe sludge. Filter this sludge out and throw it away as standard solid waste, then send the remaining treated water to a certified hazardous waste handler.
VI. Case Studies: Industrial Efficiency & Waste Minimization
Closed-loop systems are the industry standard for cutting down on waste and saving money. Here are two real-world examples of on-site solvent recycling.
Case Study 1: Closed-Loop IPA Recycling at Spectra Photopolymers
High-volume print labs face high costs from buying solvent and paying hazardous waste fees. Spectra Photopolymers (a Formlabs subsidiary) solved this by adding a solvent recycling machine to their shop.
The facility ran more than $100\text{ Form 3}$ printers, producing a massive amount of dirty IPA. They installed a CBG SolvTrue S1500 Solvent Recycler to process up to $15\text{ gallons}$ of solvent per run.
       [Dirty IPA from Wash Stations]
                     │
                     ▼
       ┌───────────────────────────┐
       │ CBG SolvTrue S1500 System │
       └─────────────┬─────────────┘
                     │ (Distillation)
                     ▼
       [99% Pure Reclaimed IPA] ◄───┐
                     │              │
                     ▼              │ [20% Makeup IPA Added]
       [Automated Wash Stations]     │ (Due to ambient evaporation)
                     │              │
                     └──────────────┘
- The Recycling Process: The distillation machine cleaned dirty IPA back to $99\%$ purity, allowing them to use it again immediately in their wash tanks.
- Handling Evaporation: The machine itself lost almost no solvent, but normal evaporation during everyday washing caused a $20\%$ volume loss per cycle. They topped this off with fresh IPA.
- The Return on Investment: By recycling $25\text{ to }30\text{ gallons}$ of IPA every day, Spectra Photopolymers cut down on solvent purchases and waste disposal fees. They paid off their equipment cost (ROI) in just $30\text{ days}$.
Case Study 2: Quantitative Distillation Efficiency
An additive equipment manufacturer ran tests on a CBG SolvTrue S700 industrial distillation unit to see how well it cleaned dirty IPA containing dissolved photopolymers.
They ran the distillation cycle under normal atmospheric pressure for $3.5\text{ hours}$. The table below shows the exact metrics from the test:
| Distillation Parameter | Quantitative Metric | Metric in SI Units |
| Input Waste Mass | $29.6\text{ lb}$ | $\approx 13.43\text{ kg}$ |
| Recovered Purified Solvent Mass | $27.2\text{ lb}$ | $\approx 12.34\text{ kg}$ |
| Residual Solid Waste Mass | $1.6\text{ lb}$ | $\approx 0.73\text{ kg}$ |
| Net Solvent Recovery Rate | $96.2\%$ | $96.2\%$ |
| Hourly Distillation Throughput | $\approx 0.8\text{ gal/hr}$ | $\approx 3.03\text{ L/hr}$ |
| Reclaimed Solvent Purity | $\approx 99\%$ IPA | $99\%$ IPA |
- The Result: The test proved that a simple distillation cycle successfully separates flammable solvents from liquid resin contaminants, giving you clean, reusable IPA. It concentrated the leftover waste into a tiny amount of solid sludge, reducing waste disposal volume by over $90\%$.
VII. FAQ: Solving Your Toughest Resin Printer Cleanup Challenges
Q1: Can I use highly flammable solvents like IPA inside an ultrasonic cleaner to speed up cleanup?
Short Answer: No. Do not put flammable solvents directly into an ultrasonic cleaner, as electrical sparks and heat can easily ignite the vapors and start a fire.
- The Safe Method (Indirect Cavitation):
- Fill the main ultrasonic tank with water to act as a safe, non-flammable transmitter for the sound waves.
- Put your printed parts and solvent (like IPA) inside a sealed, chemical-safe container (such as a glass beaker or an HDPE jar).
- Suspend this container in the water bath. The ultrasonic waves pass through the water and container walls to clean your parts safely, keeping all flammable fumes sealed inside.
- Alternative: Use non-flammable cleaning liquids like Yellow Magic, Mean Green, or Simple Green directly in the ultrasonic tank. Run them at $30\text{ to }50^\circ\text{C}$ for $5\text{ to }10\text{ minutes}$.
Q2: How do I clean up support scars on parts without causing brittle part failures?
Short Answer: Soften the supports in a warm water bath before curing them, which allows you to peel them away easily without cracking the underlying plastic.
- The SOP:
- Wash the printed part thoroughly to remove raw resin from the support joints.
- Submerge the wet, uncured print in a warm water bath (around $60^\circ\text{C}$) for $30\text{ to }60\text{ seconds}$. The heat softens the thin connection points.
- Gently peel the supports off. They will snap off cleanly without tearing chunks out of your print surface.
- Wet-sand any remaining support nubs under running water using fine-grit sandpaper (moving from $400\text{ to }3000\text{ grit}$).
- Dry the part completely, then cure it under UV light.
- For tough engineering resins, add a second cure step in a lab oven at $80^\circ\text{C}$ to optimize the polymer’s strength and remove lingering smells.
Q3: How can I clean and reuse saturated Isopropyl Alcohol (IPA) without immediate disposal?
Short Answer: Let the dirty solvent sit in a clear container so the resin settles to the bottom, decant the clean liquid, and cure the remaining sludge under UV light.
- The SOP:
- Pour your dirty IPA into a clear, chemical-resistant container and leave it in a dark room for several days. The heavy resin particles will settle to the bottom.
- Carefully pour (decant) the clean IPA off the top into a fresh container for reuse.
- Put the remaining thick sludge at the bottom under UV lamps or direct sunlight to solidify the resin.
- Throw away the cured, solid plastic according to local trash rules. This significantly reduces your volume of liquid hazardous waste.
- Use inline filters during decanting to catch smaller particles and prolong your solvent’s lifespan.
Q4: Is water-pre-washing standard (non-water-washable) resins a viable way to save solvent?
Short Answer: No. Washing standard resins in water creates a highly toxic, suspended chemical mixture that is difficult to cure, store, and dispose of safely.
- The Hidden Costs:
- Standard resins do not dissolve in water; they just detach, creating a highly toxic suspension. This water is classified as hazardous waste and cannot go down the drain.
- IPA evaporates quickly, leaving concentrated sludge behind. Water evaporates very slowly, requiring huge holding tanks and long waiting times before you can filter out the solids.
- For business operations, the space and time needed to manage toxic wastewater cost far more than what you save on IPA. Stick to a closed-loop solvent system with a distillation machine.
Q5: What should I do if my prints remain sticky or tacky post-curing?
Short Answer: Perform your final wash in clean, high-purity solvent, dry the parts completely, and cure them submerged in water to block oxygen.
- How to Resolve It:
- Make sure your final wash uses clean, high-concentration solvent (such as $90\%$ or higher IPA) to strip away all dissolved resin.
- Let parts dry completely before curing, as trapped solvent prevents proper curing.
- Use the Oxygen Exclusion Curing Method to stop atmospheric oxygen from blocking the curing reaction.
- Place your dry parts in a clear glass container filled with water, glycerin, or mineral oil, then put them in your UV curing chamber. The liquid blocks oxygen from the surface, giving you a dry, tack-free finish.
VIII. Final Takeaways & Lab Wall Checklist
Getting your resin 3D printing post-processing right requires balancing clean parts, shop safety, and costs. A two-bath washing system extends your solvent’s life and gives your parts a clean finish. Choose your cleaning chemicals based on your facility’s safety rules: highly volatile solvents like IPA work fast but require fire-safe ventilation, while non-flammable alternatives like TPM require extra wash and dry steps.
Staying compliant with safety standards like OSHA, the EPA, and ANSI requires proper lab design—including negative air pressure, ventilation, and proper PPE. For high-volume print shops, a closed-loop solvent distillation system is a proven way to cut down on waste costs, lower your solvent spend, and build a more sustainable operation.
The 5-Point Lab Wall Checklist
- [ ] Pre-Scrape: Always use a silicone spatula to return excess liquid resin to the vat before washing.
- [ ] Double-Bath Hygiene: Ensure the “Clean” wash is $\ge 90\%$ IPA and rotate it to “Dirty” as soon as residue remains on dried parts.
- [ ] Zero-Moisture Curing: Never UV-cure a part wet with solvent; air-dry IPA for $\ge 30\text{ minutes}$ or use compressed air.
- [ ] PPE Compliance: Wear $\ge 0.15\text{ mm}$ nitrile gloves and replace them every 5 minutes during active liquid contact.
- [ ] No Liquid Down the Drain: Treat and cure all wastewater, solvent runoff, and resin sludge before disposal.